
Step 1: Download and install the VRS app
There are two ways to install VRS. We recommend option 1 for beginners, or those not on Windows.
Option 1 – Go to this link on any browser
Option 2 – Download Native Binary – Go to download page and get windows installer
- Unzip the download file: VRS-Windows-installer.exe
- Open folder with the extracted file: VRS-win32-x64-installer
- Double Click on the VRS Installer.exe
Learn more on how to install VRS
Step 2: Create an OpMode
We are going to create an autonomous OpMode, but the same concept applies for teleOp.
What is an OpMode?
An OpMode is analogous to a Java class. It is a file that contains all your code and methods. There is a runOpMode method which contains the blocks that run when you press the run button
TeleOp vs Autonomous
This tutorial starts off with Autonomous programming, then moves on to TeleOp. Autonomous is when the robot navigates independently, without driver control. TeleOp is when the robot drives based on gamepad input.
How do I create an OpMode?
When you click on autonomous or teleOp from the main menu, you will be transported into the interface with an opMode auto-generated. The code in the opMode is in the blocks editor on the left. To save your OpMode, click the “Save As” button above the blocks editor. Enter the name of your OpMode, making sure you pick a clear, descriptive name. To load a saved opMode, click the Load Program button to the right of the Save As.
Step 3: What are Blocks?
You’ll see some auto-generated code in the blocks editor. This is mostly just the declarations that are needed to run the code properly. The meaning of each of this blocks can be found
How does code in VRS work?
VRS supports making methods, and variables just like FTC blocks. Such advanced concepts will be addressed later. For now, look at the auto-generated block of code and notice the blue if-do block. Inside it are some orange blocks that set motor power. All of your code will go inside this if block, as it is what the simulator runs.
Looking at the default code
The default code shows some of the most critical blocks for the simulator. Lets look through what each of them mean:
1. Set Power
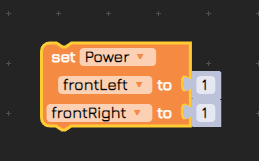
This block is used to make the motors move. Since this motor has four independently driven wheels, there are four motors, labeled to their respective positions. 1 is the maximum power you can give to a motor, and you can input any value from 0 to 1 to control its speed(negative values drive it in reverse). To find this block in the sidebar, click Actuator>DcMotor>setPower. Remember that VRS simulates a mecanum wheel robot, so you can program it to move in any direction by varying the powers.
2. Telemetry
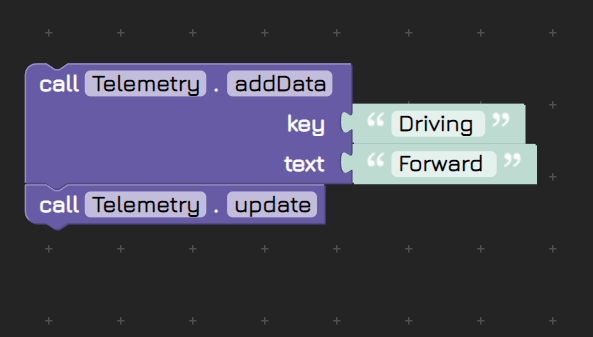
Telemetry is used to print text to the telemetry log above the field. The key is the label for the data, and the text is the value that the label represents. You can add any text here, and every time telemetry.update() is called, it will print that to the log.
3. Sleep
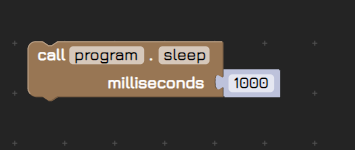
Sleep essentially halts the programs for the given number of milliseconds. This however, does not mean that the robot stops moving. It just means that the program will wait for the given amount of time before moving on the next line of code. At the very end of your autonomous mode, it is good to add a 30,000 millisecond sleep statement, so that your robot does not do anything unpredictable until the autonomous period ends.
We will come back to blocks in Step 5.
Step 4 : Running Code
Assuming that we still have the auto-generated code, let’s take a look at how to run programs in VRS. By default, VRS will run the code contained in the purple “runOpMode” block. Unless you call other methods there, they will not run.
You can select from 3 different camera angles. See this document for instructions.
Run
When running an opMode, you first initialize the program, then run it. Initialization is when basic reset code runs once, and running is when the movement actually happens. It is no different than a real FTC robot.
Above the telemetry console, you will see an Initialize Program button.

Click it, and you will see two buttons appear, one saying Start program and one saying Stop Program. Press start program to run. Your robot should move forward.

At the same time, the timer on the field will start running. Your code should auto-cutoff when the timer ends.
Step 5: Writing our own Code
Alright, now that we are familiar with the interface, let’s start writing our code. We are going to write a simple program here that will teach you the basic blocks.
Motor Power
We went over what power values mean for motors in Step 3. Now, lets find where the blocks are, and tools to help us.
You can find the blocks by going to Actuators>DcMotor. You will notice that under DcMotor, three options appear: Dual, Quad and Extended. For now, only look at Dual and Quad. Often times, you want to set all the drive motors at once. Rather than getting 4 separate setPower blocks, get one quad and set all the powers in there.
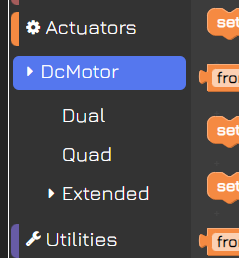
Click on Quad and drag the block that sets all the motor powers to one. Place it under the call program.sleep block. If you run the program now, you will see that nothing happens. This is because the program is terminating immediately as it hits those blocks. To prevent this, add a sleep block. Copy and paste the one from above, and you will see that the power is set for 1000 milliseconds. Change the values in the power block to see how it makes the drivetrain move. You can change the value of the sleep to make it go for longer.(Learn more about sleep here)
Loops
Loops are used to make a bit of code run a certain number of times.
You can find loops in the loops section of the blocks menu.
This was a brief intro of critical blocks in VRS. To find out more, check out the resources in the next Step
Step 6 – TeleOp
Now that we have seen autonomous, lets take a look at TeleOp. TeleOp is the driver controlled part of the FTC game. Unlike autonomous, TeleOp is pre-programmed. All you have to do is plug in a controller into your computer and play. VRS provides a great way to practice driving. You will need an FTC legal controller to use teleOp. If you don’t have one, skip this step. Let’s take a look.
Enter TeleOp
If you are still in autonomous, click the back button at the top left. Click teleOp in the main menu, and now you will be asked to select singleplayer or multiplayer. Multiplayer creates a lobby for multiple people to play over the internet. For now, lets go into single player. You will see a green play button on the top left. Press it to start the game. As long as your controller is plugged in, VRS should auto detect the controller and immediately take input. For a list of keybinds, see this document.